What is AWS Sagemaker Pipelines?
AWS SageMaker is Amazon’s fully managed cloud machine learning (ML) service. It enables data scientists and developers to quickly build, train, and deploy ML models directly into a production environment.
AWS SageMaker Model Building Pipelines represent a machine learning pipeline for a specific ML model. They consist of interconnected steps defined by a JSON pipeline definition. Here are the components involved in this process:
- A JSON pipeline definition—uses a directed acyclic graph (DAG) to encode your pipeline.
- A DAG—provides information on pipeline requirements for each step and the relationships between all pipeline steps. The data dependencies between the pipeline’s steps determine the structure of the DAG.
- Data dependencies—created when a step’s output’s properties are passed as input for another step.
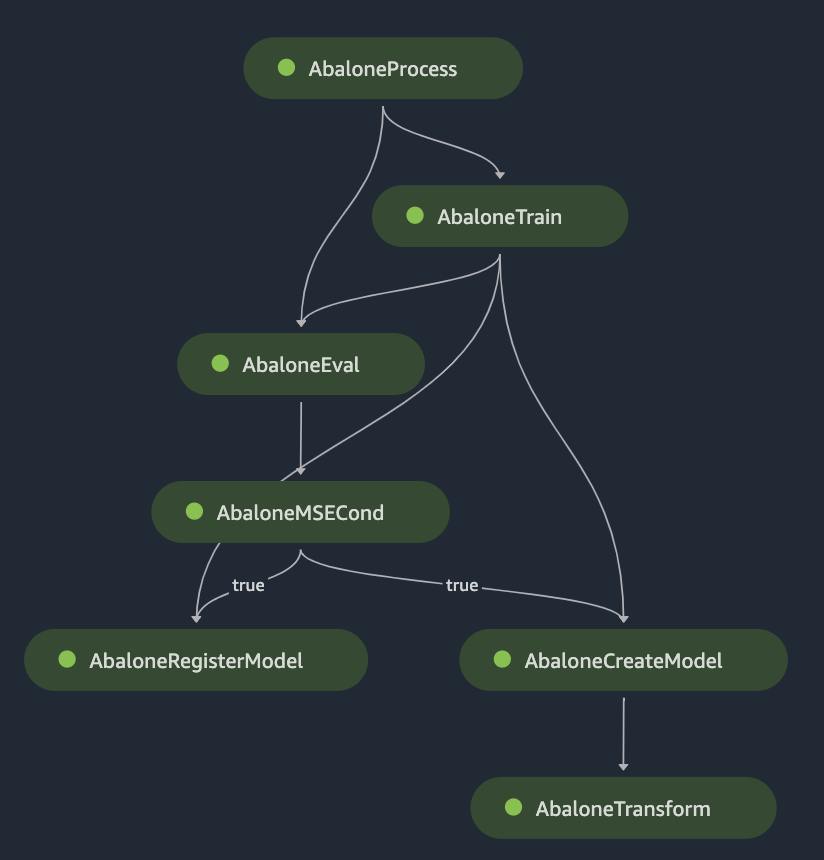
The image below illustrates a pipeline DAG example:

Related content: Read our guide to AWS SageMaker
In this article:
Sagemaker Pipeline Structure and Execution
An Amazon SageMaker Model Building Pipelines instance consists of:
- A name—must be unique within an account and Amazon region
- Parameters—all parameters used in step definitions must be defined in the pipeline.
- Pipeline stages—the listed pipeline stages automatically determine their execution order based on their mutual data dependencies.
The SageMaker Pipelines service resolves relationships between steps in a data dependency DAG to create a series of steps that complete execution.
Here is an example of a pipeline structure:

Pipelines with Custom Parallelism Configuration
By default, a pipeline runs all stages that can run in parallel. This behavior can be controlled using the ParallelismConfiguration property when creating or updating a pipeline and when starting or retrying pipeline execution.
Parallelism configuration is applied on a per-execution basis. For example, if you start two runs, you can run up to 50 steps for each run, for a total of 100 concurrent steps. Also, parallel configurations specified at start, retry, or update runtime take precedence over parallel configurations defined in the pipeline.

Amazon Sagemaker Pipeline Steps
A SageMaker pipeline consists of steps that define the relationships between steps and the actions the pipeline can take. Here are the steps SageMaker pipelines support:
Processing Step
This step creates a processing job for data processing.
Here are the requirements for a processing step:
- A processor
- A Python script defining your processing code
- Outputs for processing
- Job arguments
Training Step
This step creates a training job to train your ML model.
Here are the requirements for a training step:
- An estimator
- Training and validation data inputs
Tuning Step
This step creates a hyperparameter optimization (HPO), also known as a hyperparameter tuning job. Each tuning job can run several training jobs, with each training job producing a version of your model.
CreateModel Step
This step creates a SageMaker model.
Here are the requirements for a SageMaker step:
- Model artifacts
- Specifications of the desired SageMaker instance type for creating the model
RegisterModel Step
This step registers a sagemaker.pipeline.PipelineModel or sagemaker.model.Model with the SageMaker model registry. Your PipelineModel represents an inference pipeline, a model that consists of a linear sequence of containers responsible for processing inference requests.
Transform Step
This step uses batch transformation to run inference on the entire dataset.
Here are the requirements for a transform step:
- A transformer
- Data for the batch transformation
Condition Step.
This step evaluates the condition of step properties to determine which action to take next in the pipeline.
Here are the requirements for a condition step:
- A list of conditions
- A list of steps to run when the condition evaluates to false
- A list of steps to run when the condition evaluates to true
Callback Step
This step incorporates additional AWS services and processes into the workflow. It enables you to add processes not directly provided by the pipeline.
Lambda Step
This step runs an existing AWS Lambda function or a new one created by SageMaker.
ClarifyCheck Step
This step conducts baseline drift checks against previous baselines for model explainability and bias analysis.
QualityCheck Step
This step conducts drift checks and baseline suggestions against a previous baseline to evaluate your pipeline’s model quality or data quality.
Amazon EMR Step
This step processes EMR steps to a running Amazon EMR cluster.
Fail Step
This step stops a SageMaker Pipelines execution when a desired state or condition is not achieved. It also marks this pipeline’s execution as failed. You can use this step to specify a custom error message that indicates the cause of the failure.
Tutorial: Create and Execute SageMaker Pipelines
Let’s see how to create a simple ML pipeline in SageMaker.
SageMaker Pipelines comes with SageMaker Python SDK integration, so you can use a Python-based interface to build each step in your pipeline. To orchestrate your workflow using an Amazon SageMaker model building pipeline, you must create a directed acyclic graph (DAG) in the format of a JSON pipeline definition.
You can create a SageMaker DAG definition in JSON format using the SageMaker Python SDK, and send it to SageMaker to start running.
Here is the general process:
- You deploy a pipeline
- After the pipeline is deployed, you can use Amazon SageMaker Studio to view the pipeline's directed acyclic graph (DAG) and manage its execution.
- You can use SageMaker Studio to get information about current and historical pipelines, compare runs, view DAGs of runs, get metadata information, and more.
In this tutorial we’ll show the first two steps. For the remaining steps, consult the documentation.
Step 1: Deploying A Pipeline
- Make sure your JSON pipeline definition is in the correct format:
import json
json.loads(pipeline.definition())
- Send the pipeline definition to the SageMakerPipelines service to create a pipeline (if it does not exist) or update the pipeline (if it exists). The SageMaker pipeline uses the ARN role you provide to create any actions defined in the pipeline steps.
pipeline.upsert(role_arn=role)
- Start a pipeline execution:
execution = pipeline.start()
Step 2: Managing Pipeline Execution in Studio
- Open SageMaker Studio, and in the left sidebar, click the SageMaker resources icon.

2. Select Pipelines from the dropdown list.
3. Drag the right border of the SageMaker Resources pane to the right to reveal all columns. Use the search to narrow the list of pipelines.
4. Click a pipeline to view details about it.
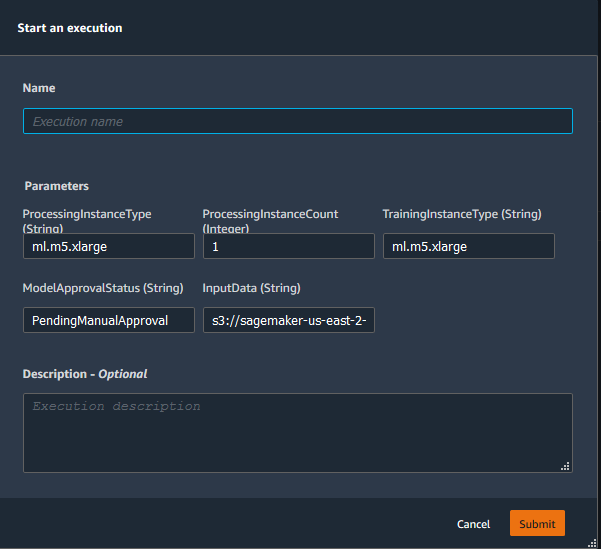
5. From the Executions or Graph tab in the execution list, choose Start an execution.

6. Enter or update the following required information:
- Name—must be unique to your AWS Region and account.
- ProcessingInstanceType—the compute instance type to use for processing tasks.
- ProcessingInstanceCount —the number of compute instances to use for processing tasks.
- TrainingInstanceType—the instance type to use for training.
- ModelApprovalStatus—a convenience field that lets you track model status.
- InputData—the S3 URI of the dataset used by the pipeline.

7. Click Submit. You can now perform the following actions via buttons on the status banner:
- View or stop execution details by selecting Show details.
- Stop running the pipeline by clicking Stop.
- Resume execution where it left off by selecting Resume.
Machine Learning Resource Orchestration with Run:ai
When using AWS SageMaker, your organization might run a large number of machine learning experiments requiring massive amounts of computing resources. Run:ai automates resource management and orchestration for machine learning infrastructure. With Run:ai, you can automatically run as many compute intensive experiments and inference workloads as needed.
Here are some of the capabilities you gain when using Run:ai:
- Advanced visibility—create an efficient pipeline of resource sharing by pooling GPU compute resources.
- No more bottlenecks—you can set up guaranteed quotas of GPU resources, to avoid bottlenecks and optimize billing.
- A higher level of control—Run:ai enables you to dynamically change resource allocation, ensuring each job gets the resources it needs at any given time.
Run:ai simplifies machine learning infrastructure pipelines, helping data scientists accelerate their productivity and the quality of their models.
Learn more about the Run:ai GPU virtualization platform.

