What Is Amazon Sagemaker Autopilot?
Amazon SageMaker Autopilot automatically builds, trains, and tunes machine learning models in the cloud based on your data, while maintaining full control and visibility.
Typically, to build a machine learning (ML) model you need to manually prepare data, test different algorithms, and optimize model parameters to find the best approach for your data. This is time consuming and requires specialized expertise. An alternative is to use fully automated machine learning methods (AutoML), but these methods often do not provide insight into how data affect model predictions. As a result, they are not reproducible, and do not provide visibility into how they make decisions, so are less reliable.
Amazon SageMaker Autopilot provides a middle ground between these two approaches. It lets you provide a dataset, have SageMaker automatically identify, train, and tune the best ML models for the data, and get in-depth visibility into how the model is working and why it generates its predictions.
Related content: Read our guide to AWS SageMaker
In this article:
How AWS SageMaker Autopilot Works
SageMaker Autopilot is a set of features that automate key machine learning (ML) tasks. These features explore data, select relevant algorithms based on the specific ML problem, and prepare the data for model training or tuning. Autopilot automatically resamples prospective algorithms using cross-validation procedures to evaluate their capacity to make predictions based on new data inputs (i.e., not training data).
Autopilot provides metrics that assess the predictive abilities of candidate ML models. It simplifies the machine learning process using automated tasks in an AutoML pipeline. After testing the optimized ML models, it ranks them by performance and identifies the best-performing model. This approach lets you deploy the appropriate model much faster than normal.
There are various ways to use Autopilot. It can operate automatically (i.e., on autopilot) and with varying degrees of human intervention. You can use it with or without code—the former via an AWS SDK and the latter via Amazon SageMaker Studio. Autopilot supports binary, regression, and multi-class classification problems. You can use Autopilot to build a machine learning model on massive datasets with hundreds of GBs.
Tables
Autopilot supports data tables formatted as Parquet or CSV files, with every column containing specific features and data types while the rows contain observations. Accepted data types for columns include text, numerical, time, and categorical series consisting of number strings separated by commas.
Explainability
It can explain the process models used to make predictions using feature attribution (a capability for SageMaker Clarify). Autopilot automatically generates reports indicating each feature’s importance for the predictions that the best candidate model made.
This functionality makes it easier for AWS customers to understand ML models. You can use Autopilot’s model governance report to make informed risk and compliance decisions and present the report to external auditors and regulators.
Visibility
Autopilot provides full visibility into the processes used to wrangle data, select models, and train and tune each candidate tested. Autopilot generates notebooks for every trial—these notebooks contain the code used to identify the best candidate model. Notebooks are also an educational tool and can guide you when conducting experiments. They provide information about how various decisions and inputs impact your experiments.
You can examine the various candidate and data exploration notebooks and conduct additional experiments on high-performing models by modifying and rerunning the notebooks.
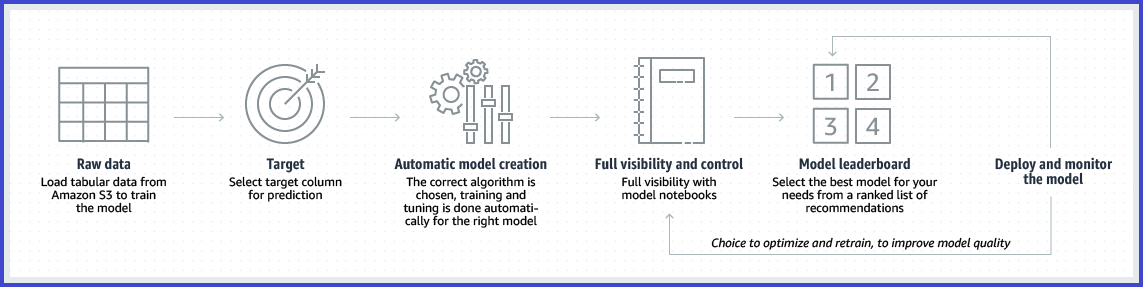
The following diagram outlines the main steps of an Autopilot-managed AutoML process.

Amazon SageMaker Autopilot Explainability
Amazon SageMaker Clarify provides tools that SageMaker Autopilot uses to explain how ML models make predictions. Developers and ML model creators can use these tools to understand a model’s characteristics before deploying it. You can use Clarify tools to debug a model’s predictions after deployment.
Machine learning model transparency is important for regulators and consumers, who must trust the predictions to base their decisions on them. Autopilot’s explainability functionality reveals how a model arrives at its conclusions using model-agnostic feature attribution. This approach helps you understand why your trained model made a given prediction, providing per-instance explanations at inference.
This implementation includes an efficient, scalable SHAP implementation based on the Shapley value concept (in game theory)—each feature has a value describing its importance for a given prediction. Explanations are useful for auditing and ensuring regulatory compliance. They help you build trustworthy models, inform human decisions, debug models, and improve predictive performance.
Amazon SageMaker Autopilot Notebooks
SageMaker Autopilot implements the automatic machine learning process using AutoML jobs. An AutoML job generates three notebook reports describing Autopilot’s procedure to build candidate ML models—each candidate model has a pipeline/algorithm pair.
The first notebook is data exploration, describing Autopilot’s conclusions based on your provided data. The second notebook is candidate definition—it generates candidate models using the information about your data. The third notebook is a model insight report detailing the best-performing model’s characteristics.
Amazon SageMaker Autopilot Tutorial: Create an Experiment
Let’s see what steps are involved in creating, training, deploying, and viewing the results for an ML model with SageMaker Autopilot. This is abbreviated from the official AWS tutorial.
Step 1: Create an Experiment
In Amazon SageMaker Studio, select Build model automatically > New autopilot experiment.
Provide experiment details—name, S3 bucket to get data from, and target S3 bucket and column for model results. That’s it—you don’t need to define a specific model and its parameters at this point (but if you want to customize the model, you can do this in advanced settings).

Click Create Experiment. SageMaker shows the experiment’s status:

Step 2: Deploy the Model
Deploy the model in one of two ways:
Automatic deployment—this means that SageMaker will test multiple models and automatically deploy the model with the best results.

Manual deployment—you can manually deploy the best model after evaluating it.
Step 3: View Models Generated by Autopilot
To view the models generated by SageMaker autopilot:
- Open the Components and registries page
- From the Projects menu select Experiments and trials

- In the Unassigned trial components sections, identify the Autopilot job you ran earlier
- Right-click your model and click Describe AutoML Job

You can now view all the models generated by AutoPilot and see:
- Objective: F1_binary, F1, AUC, and other accuracy metrics
- A drill down of the model identified as “best” and its details (or other models tried by AutoPilot) by right-clicking the model and selecting Open in model details.

Step 4: Explain the Model’s Predictions
SageMaker uses the SHAP model to help you explain why a model generated specific predictions. AutoPilot provides a plot of SHAP values that show the importance of each feature for your model. For more details see Amazon’s white paper on model explainability.

Machine Learning Resource Orchestration with Run:ai
When using AWS SageMaker, your organization might run a large number of machine learning experiments requiring massive amounts of computing resources. Run:ai automates resource management and orchestration for machine learning infrastructure. With Run:ai, you can automatically run as many compute intensive experiments and inference workloads as needed.
Here are some of the capabilities you gain when using Run:ai:
- Advanced visibility—create an efficient pipeline of resource sharing by pooling GPU compute resources.
- No more bottlenecks—you can set up guaranteed quotas of GPU resources, to avoid bottlenecks and optimize billing.
- A higher level of control—Run:ai enables you to dynamically change resource allocation, ensuring each job gets the resources it needs at any given time.
Run:ai simplifies machine learning infrastructure pipelines, helping data scientists accelerate their productivity and the quality of their models.
Learn more about the Run:ai GPU virtualization platform.

