What is MLflow?
MLflow is an open source platform for managing machine learning workflows. It is used by MLOps teams and data scientists. MLflow has four main components:
- The tracking component allows you to record machine model training sessions (called runs) and run queries using Java, Python, R, and REST APIs.
- The model component provides a standard unit for packaging and reusing machine learning models.
- The model registry component lets you centrally manage models and their lifecycle.
- The project component packages code used in data science projects, ensuring it can easily be reused and experiments can be reproduced.
There are two other key concepts in MLflow:
- A run is a collection of parameters, metrics, labels, and artifacts related to the training process of a machine learning model.
- An experiment is the basic unit of MLflow organization. All MLflow runs belong to an experiment. For each experiment, you can analyze and compare the results of different runs, and easily retrieve metadata artifacts for analysis using downstream tools. Experiments are maintained on an MLflow tracking server hosted on Azure Databricks.
In this article, you will learn:
MLflow Tracking
MLflow Tracking is an API and user interface component that records data about machine learning experiments and lets you query it. MLflow Tracking supports Python, as well as various APIs like REST, Java API, and R API.
You can use this component to log several aspects of your runs. Here are the main components you can record for each of your runs:
- Source—can be the name of the file that launches the run. Alternatively, if you are using an MLflow project, it can be the name of the project and entry point of the run.
- Code version—when using an MLflow Project, this would be the Git commit hash.
- Parameters—can be any key-value input parameters you choose, as long as the values and the keys are both strings.
- Artifacts—are output files (in all formats). Artifacts let you record images, PNGs for example, models (such as pickled scikit-learn models), and data files such as Parquet files.
- Start and end time—lets you record the start and end time of your run.
- Metrics—let you record key-value metrics containing numeric values. It is possible to update each metric throughout the duration of a run. This lets you, for example, track how the loss function of the model is converging. Additionally, MLflow lets you visualize the full history of each metric.
This information is highly useful for visualizing the results of each run as well as analyzing the experiment as a whole.
Tracking UI
You can use the tracking UI to visualize, compare, and search runs. Additionally, it lets you download metadata or artifacts for runs, which you can input for analysis in other tools. MLflow logs information about runs in an mlruns directory; in order to view the data, you can run the MLflow UI one directory above the mlruns folder.
Notable features of the tracking UI include listing and comparison of runs by experiments, and downloading the results of your runs. Additionally, you can search runs by metric value or parameters, as well as visualize metrics of each run.
MLflow Projects
MLflow projects let you package data science code in a reproducible and reusable way, mainly according to conventions. The projects component comes with an API as well as command-line tools designed for running projects. These features ensure you can chain projects together into machine learning workflows.
For each project, you can specify the following properties:
- Name—you can choose a human-readable name for your projects.
- Environment—lets you define the software environment used to execute the entry points of the project, including all library dependencies required by project code.
- Entry points—lets you specify the commands you want to run inside the project, as well as information about the parameters. A project typically contains at least one entry point that users can call.
You can use a Git URI to run your project. Alternatively, you can use the MLflow run command-line tool to run the project from a local directory.
Project Environments
Here are the project environments currently supported by MLflow:
- System environment—you can run projects directly in your existing system environment. To do this, you need to install all project dependencies on the system before executing the project. Note that the system environment is not part of the contents directory or the MLproject file. Rather, it is supplied at runtime.
- Conda environment—offers support for native libraries like Intel MKL or CuDNN as well as python packages. If you specify a Conda environment for your project, it will be activated before the project code starts running.
- Docker container environment—a container lets you capture non-Python dependencies like Java libraries. MLflow projects that use Docker images get an added Docker layer that copies the contents of the project into a directory called /mlflow/projects/code. Once this happens, a new container image is produced. Next, MLflow runs the image and invokes the project entry point in the resulting container.
MLflow Models
MLflow models let you package machine learning models in a format supported by many downstream tools. You can add metadata to your MLflow models, including:
- Model signature—defines the schema of the inputs and outputs of your model. You can use either tensor-based or column-based model inputs and outputs. You can describe column-based inputs and outputs as a sequence of named columns and specify the MLflow data type. You can do the same for tensor-based inputs and outputs, and specify a numpy data type. Note that signatures are stored as JSON in the MLmodel file, along with additional model metadata.
- Model input example—this is an artifact that is an instance of a model input, stored together with your model. You can use either column-based or tensor-based inputs.
MLflow Model Registry
MLflow Model Registry provides an API and UI for centrally managing your models and their lifecycle. The registry provides model lineage, model versioning, annotations, and stage transitions.
Here are key features and concepts to know when using the model registry:
Registered model
In MLflow, a registered model is one that has a unique name and metadata, contains model versions and transitional stages, and has a model lineage.
Model version
A registered model can contain one or more model versions. When you register a new model in the registry, it is considered version 1. Any new model using the same name is added as a subsequent version.
Model stage
For each model version, you can assign one stage, at any time. However, stages must be assigned according to the officially determined MLflow stages, such as staging, production, and archived. It is possible to transition a model version from one stage to another.
Annotations and descriptions
MLflow lets you annotate the top-level model as well as each individual version, using markdown. You can add descriptions and any relevant information, such as algorithm descriptions, methodology, and dataset employed.
MLflow Plugins
The MLflow Python API comes with APIs that let you write plugins you can integrate with other ML frameworks and backends. You can use these plugins to integrate with third party storage solutions, as well as third party authentication providers.
You can also use plugins to customize the behavior of the MLflow Python client. This can help you, for example, use the client to communicate with other REST APIs. Additionally, you can use plugins to automatically capture metadata as run tags, and add a new backend designed to execute entry points.
Here are key types of plugins supported by the MLflow Python API:
- Run context providers—this plugin lets you define context tags for runs created through the mlflow.start_run() fluent API.
- ArtifactRepository—lets you override the logic of artifact logging.
- Tracking store—helps you override the logic of your tracking backend.
- MLFlow project backend—lets you override the local execution backend and instead execute a project on your own cluster.
- Model registry store—enables you to override the logic of the model registry backend.
Now that you understand the basics of MLflow, you may want to check out our guides about key concepts in machine learning engineering:
MLflow Tutorial
This tutorial shows how to use MLflow to train a simple linear regression model, package the code in model format, and deploy it to an HTTP server. It is abbreviated from the official MLflow tutorial (see the full source code here).
Before starting the tutorial, install MLflow, scikit-learn and Conda, and clone the MLflow repo to your local machine.
Training the Model
MLflow provides several examples of code that uses MLflow tracking APIs to log data about training runs. We will use the sklearn_elasticnet_wine example, which contains a sample data set that is suitable for linear regression analysis.
Ensure your current working directory is examples, and run the following command to train a linear regression model:
python sklearn_elasticnet_wine/train.py <alpha> <l1_ratio>
Run this command several times, experimenting with different values of alpha and I1_ratio. Metrics about each run are logged in the directory mlruns.
Within the training code, this function is invoked every time you run the model, saving the model as an artifact within a run:
mlflow.sklearn.log_model(lr, "model")
Evaluating Model Performance
Now, you can use the MLflow UI to evaluate how the model performed. Change directory to mlruns and start the UI, using the command mlflow ui. Open a browser and visit http://localhost:5000 to see the interface.
You will see a list of runs, with metrics showing how your model performed with each set of hyperparameters. Each line in the table represents one of the times you ran the model.

The UI lets you filter the table to see specific runs, or export it as CSV.
Packaging Training Code
Now that we have evaluated the model, let’s package the training code so it can be reused by others. You do this using two files.
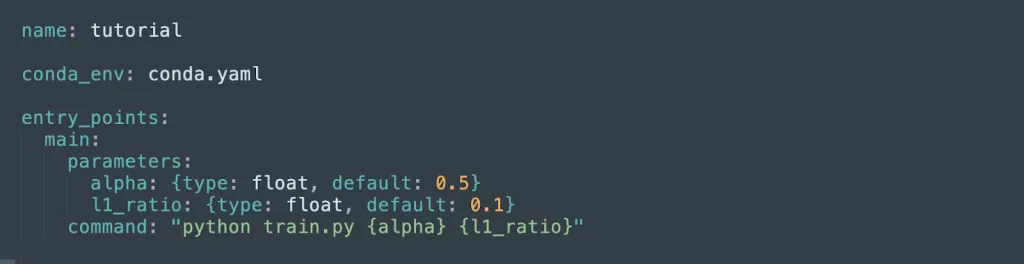
MLproject file
This file, located under the sklearn_elasticnet_wine example directory, specifies the parameters of the project, the command used to train it, and points to a conda configuration file which holds the project dependencies. It looks like this:
Conda configuration file
The conda.yaml file defines the dependencies of the project:

Running the project
Now that the project is packaged by MLflow, you can run it from any environment, including remote machines. MLflow runs your code in a Conda environment with the dependencies specified in conda.yaml.
Deploying the Model
In the training code, each time you ran the model, it was saved as an artifact within a run. Open the MLflow UI and click the date or a specific run. You will see a screen like this:

At the top, MLflow shows the ID of the run and its metrics. Below, you can see the artifacts generated by the run—an MLmodel file with metadata that allows MLflow to run the model, and model.pkl, a serialized version of the model which you can run to deploy the model.
To deploy an HTTP server running your model, run this command. Replace the {PATH} with the actual Full Path shown in the UI for the specific run you want to deploy:
mlflow models serve -m {PATH} -p 1234
You can now use the server to get predictions from your trained model. The following code shows how to run the model on common operating systems:

Managing Machine Learning Infrastructure with Run:AI
With our MLflow integration, jobs can be scheduled with the Run:AI scheduler. For a detailed walkthrough of how to run Jobs with MLflow using the Run:AI scheduler, see our MLflow integration entry in our Documentation Library.
When using MLflow with Run:AI, you enjoy all the benefits of our platform:
- Advanced visibility—create an efficient pipeline of resource sharing by pooling GPU compute resources.
- No more bottlenecks—you can set up guaranteed quotas of GPU resources, to avoid bottlenecks and optimize billing.
- A higher level of control—Run:AI enables you to dynamically change resource allocation, ensuring each job gets the resources it needs at any given time.
Run:AI simplifies machine learning infrastructure pipelines, helping data scientists accelerate their productivity and the quality of their models.
Learn more about the Run:AI GPU virtualization platform.

